Design and build my ideal wood workshop
Design and build my ideal wood workshop has come about quite quickly for reasons that will become clear in this article.
Whilst I still have two or three projects underway at the moment I have decided to push ahead with the upgrade to my wood workshop.


Background to upgrading the existing wood workshop.
I have always preferred metal work. Indeed I have gone on record several times expressing my strong dislike of wood as a material. Its so messy!
However, with the coming of 4 grandchildren, various toys have been made for them. These range from Dolls houses to a play kitchen, various wooden puzzles, a 2 section extending ladder (for my grandson who can now reach many more things Mum and Dad don’t care for 🙂 )and pull along trains etc. I have come to sort of enjoy working with wood but only if you have the tools for the job.


Why build the wood workshop then?
Wood turning however is a different matter. I really love turning wood. The freedom away from the accuracy required of metal work, is stimulating in its own right. Using wood though is still messy and I didn’t want wood in the main engineering workshop. It soon became clear I needed a separate wood workshop or shed.
At that time I didn’t want to place too much investment into something that may only be rarely used. So I had a 10’ x 8’ wood shed erected to the side of the double garage. 7 or 8 Years on its still there. Because of its size and durability issues that are starting to show, means its time to upgrade.
When to start?
My neighbour has had the builders in over the last couple of weeks or so and as they were finishing up last Friday night I invited them around to discuss extending my existing shed base. After coming up with a price I asked when could they do the work. I was fully expecting a February/March date but was told that because of his starting building 2 houses and a large extension, they only had one free week for several months. I nearly fell over when he said we can start next Monday!
There was only one answer to that timescale though, “Yes please”.
Now though I needed to start planning the new workshop in earnest.
Planning
As part of the planning process I decided that I should take account of any lessons to be learned from the first workshop and to concentrate on 3 areas. Namely:-
1. The space available is too restricted.
With the addition of a router table and a good bandsaw the present workshop is much too small. The router table gets little use because of the space it needs is not there. The bandsaw is not in the best orientation because of the size of its footprint. The addition of a future floor standing table-saw is impossible (Already purchased and with Charnwood until the new year).2. The fabric of the shed is deteriorating especially the floor and the roof
The present workshop is insulated with polystyrene and a plasterboard finish then painted. Problems with plasterboard, particularly when screwing anything bearing weight to it, are well known. So next time I will use plywood sheeting to cover the insulation. Thicker wood to be used in its construction. A minimum of 19mm. Outside protection hasn’t really been successful either. I painted it with fence paint and whilst renewing it every year it never seemed to me to be that good. A good quality wood exterior paint will be used instead.
2. Opportunity to relocate equipment from the metal workshop.
My powder coating system, including Baby Belling oven and the sand blaster, also migrate to the new shop. The CNC router will move as well so that will leave much more room in the metal workshop.
I am not the tidiest of workers. My spinal, and now neurological issues add to my untidiness (well thats my excuse). As I say, if it falls on the floor it must mean it wants to be there! As you may have guessed I have quite a few doubled up tools now! It seems to the untrained eye that its a mess. Thats not true, its organised chaos, (:) ) so the new workshop must not be an excuse to fills its space with rubbish……..watch this space to see if I manage it 🙂
3. Other issues.
Electrical sockets were added as double face mounted sockets. Since I didn’t want to interfere with the house mains supply I decided to treat the shed as a fixed ‘extension lead’ so the feed goes into one of the metal workshops existing sockets.
Whether that will be suitable or no for the higher rated equipment I have, or will purchase, is under consideration. It may be better for an electrician to at least make the mains connection.
Aid’s to planning
1 Spreadsheet
Looking at various sources for suppliers of workshops/sheds I decided to use eBay. It was surprising to see how many companies were selling sheds and workshops. To help deal with the responses of possible suppliers I felt that a spreadsheet would be the best tool. The specification could be listed and where the supplier met that part, it could be recorded by simply colouring that cell. Contact details, such as phone numbers and email addresses added as well. It should make it possible to get the best value for money I can.
The search stopped when I got to a list of 14 companies! All the sheds/workshops they were selling stated they were happy to receive requests from customers to build what the customer wanted.
I drew up my requirements, including a crude plan, which was then emailed to them on Sunday night. The spreadsheet was updated to reflect the emails sent out and the computer was switched off!!
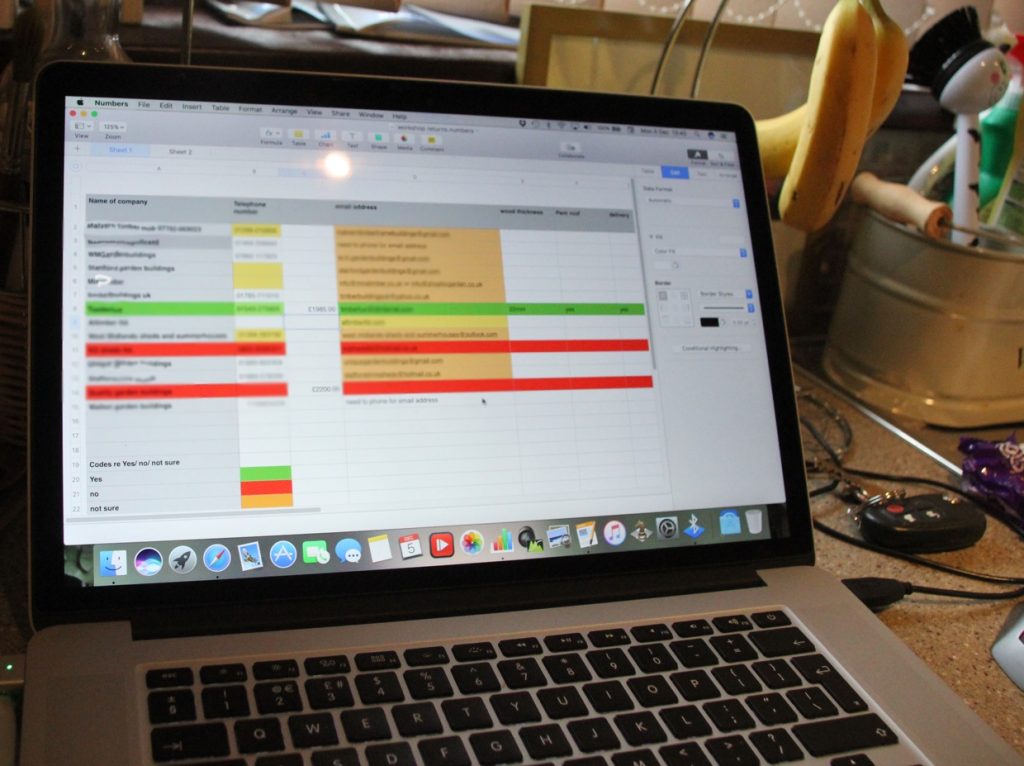
I was amazed when the first 4 replies came in (the process is still under way at the time of writing) to find that for exactly the same specification, they range from £1,985 to £4,600!
How can that be? Well my only thought is……….I haven’t a clue.
2 Email
You may consider this an obvious choice, but you would be wrong. Even though the same email went out to everyone, with the same plan and spec I still had two people (at time of writing) phone me up. One asked me what I wanted. I went though the detail in the email sent to him before he said “oh, we don’t do that thickness mate!
The second phoned and said he could do all I wanted for £2100. I wasn’t’t convinced he had read the email so asked what type of roof covering that included and he replied it was felt roof. When I said that was one thing I did not want, he said that they only do felt and it would be best if I had his sheed then sort out the roof covering myself.
Most importantly though I want the deal in writing! A wise choice if three of the companies is anything to go by. Why three? well I did have one strange email conversation which came as quite a shock. I will name this company because you may want to consider their customer service if you consider using them. To my knowledge the first contact I had with them was the email sent out with the plan and spec. Why I mention this will become clear.
Here goes…….From me…..
Hello,
I have a specification for a new workshop which is attached. Would you please give me a quote or if not interested could you also let me know so I can move forward?
Many thanks
Mike Freeman
—————————————————————————————————————-
From them:
Good Morning
Michael as we replied before we do not use tantalised timber and corrugated roof sheets ! please read on e of our 20×10 workshop/garage listing 13mm /19mm kiln dried cladding that what we use and supply! kind regards kdsheds
——————————————————————————————————————-
From Me:
Many thanks for the reply. Sorry I asked before. I won’t be ordering a shed but thanks for letting me know.
Mike
Note: as far as I know I hadn’t emailed them before.
——————————————————————————————————
From them:
Why email and ask idiot! We can do with wasting our time and hassle explaining what you could not be bothered to read! We have genuine customers to attend to !! do not email us again! good day
The company? KD Sheds
I will leave you to make your own judgement as to their level of service
My list of requirements
Specification
1 Wood thickness min 19mm
2 Pent style roof (one that only slopes from higher front to lower back)
3 Price to include both delivery and erection of the workshop
4 Must be tanalised/treated wood
5 Roof covering must not be roofing felt. Can be Metal or corrugated sheeting
6 Have a dividing interior wall with door placed 6’ from the opposite end to the door.
7 Windows to the plan giving as much light as possible. Don’t mind opening/glass or j just sealed and perspex
8 Double Doors on the end panel to the right of the front facing wall.
9 Timber Skid/ plinth system (negates planning laws)
10 Check lead time to delivery is suitable.
A simple plan was attached to clarify what I hoped to achieve.
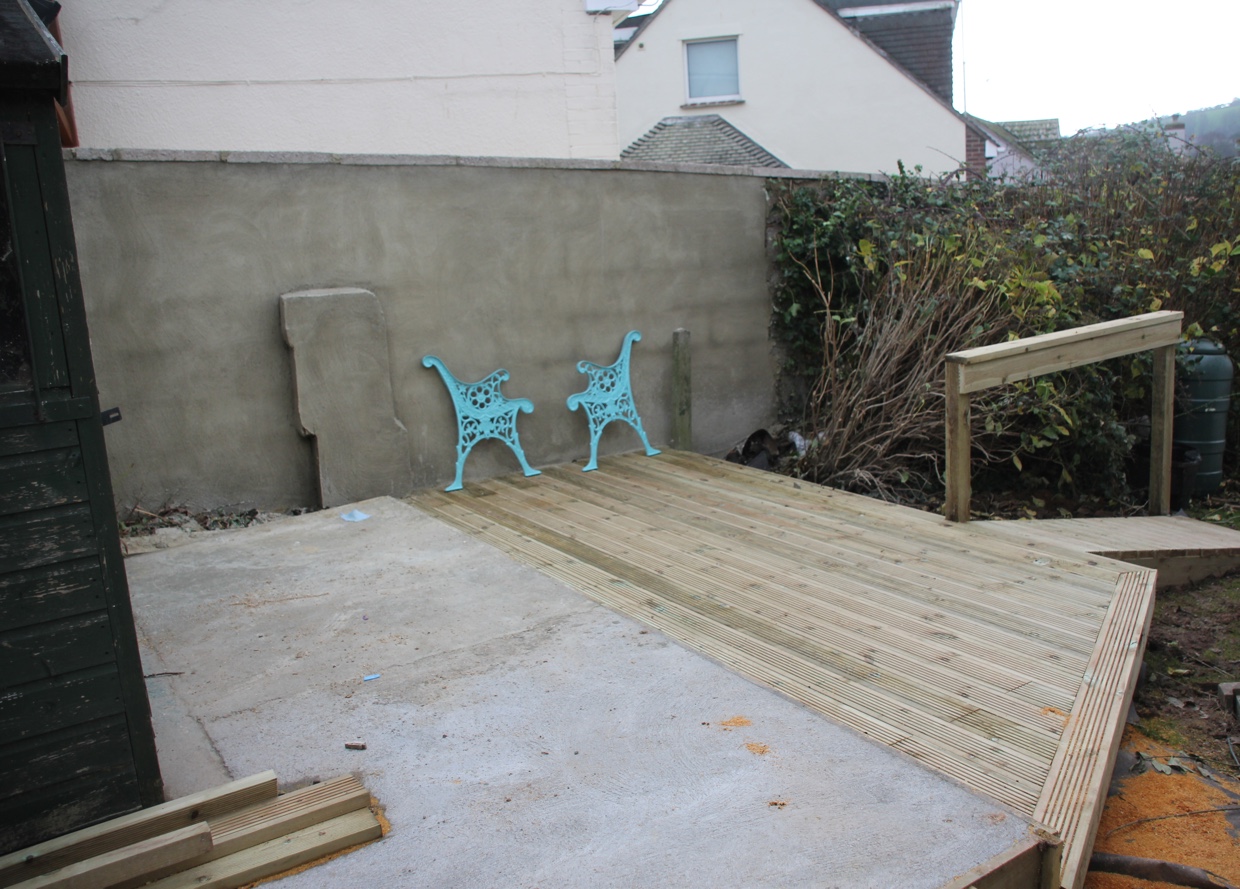
The construction of the base for the 20′ x 12′ workshop
Monday morning saw the builders arrive and we walked around discussing the finer points of my requirements. I decided that in addition to the concrete base I would like a timber decking area. If placed just outside of the workshop that would allow for working outside on nice days. It would also tie in with some landscaping taking place in the early spring 2017.
Due to the sloping nature of the site a ramp is a necessity. Deteriorating health and mobility are a given unfortunately, so there must be ramp access to the workshop.
After seeing the overall size of the new base I asked the builders whether they had allowed for the excess border? Their reply was no. It was being built to the size of the new workshop. When asked why no overlap, he made the point that if there is a border around the shed (as my existing one has)then water from the edge would run under the workshop!
All of a sudden it all made sense. That is why I suffer the rising water through the floor! The rain runs off the concrete and finds its way underneath. DOH. I will still put a membrane down before the new workshop is erected.
Progress
Progress is coming along and here are the latest photo’s. Tomorrow will see the concrete wall rendered so finishing their contribution.
More to come, so please visit again to catch up. I am hoping the new workshop is erected around the mid to late January 2017. A lot of work will be required then. With painting the outside and fitting out the inside I’m in for a bust woodworking session. Did I say I didn’t like wood!
Planning of equipment location
The next stage is to see where the best locations for the machinery will be. Will they fit, best to group together etc. To help me decide on the size of 20′ x 12′ I used graph paper to mark the overall workshop size. Then the footprint measurements of all existing machinery were taken and squares of graph paper made to match. This method allowed for easy readjustment instead of trying to move real machines.
It also allowed me to think through the benefits of having a paint area, a sanding area and of course led the the internal wall to accommodate my electronics equipment. A photo will show what I mean I hope…..


Hello Bro,
Like the dedication to planning, I wonder is this a wood working shed or a new Man Cave?? Perhaps KD Sheds have a glut of customers and do not want anymore. I think you are well shot of them as a supplier. The decking is a nice idea and perhaps I might copy it if I get time in the summer!!
Regards
Steve
I still can’t believe their tirade! Amazing. KD Sheds have an interesting communication style. I leave it at that.